
How To Deploy Open Source Rocket.Chat on Kubernetes
Reading Time: 9 Minutes
by | March 24, 2017
Overview of Deploying Rocket Chat on Kubernetes
In this Blog, We will Cover How to Build Slack like Online Chat using Rocket Chat and Deploy on Containers using Docker and Kubernetes.
Before This, We are Using Rocket Chat application on OpenStack Instances on On-Premises Deployment.
So We Migrated our Existing On-Premises Cloud Infrastructure to Containers based on Docker and Kubernetes.
As per official Docker Documentation, Docker is an open platform for developers and sysadmins to build, ship, and run distributed applications, whether on laptops, data center VMs, or the cloud.
Kubernetes is container orchestration layer on top of container runtime/engine to manage and deploy Containers effectively.
Prerequisites for Rocket Chat Deployment on Kubernetes
For Deployment you need
-
Shared Persistent Storage - Option are GlusterFS, Ceph FS, AWS EBS, AzureDisk etc.
-
Rocket Chat Application
Kubernetes is for automating deployment, scaling, management, the orchestration of containerized applications. We can use kubernetes cluster or for testing purpose we can also use minikube for Kubernetes.
For Shared Persistent Storage, we are using GlusterFS.GlusterFS is a scalable network file system.
Rocket.Chat is a Web-based Chat Server, developed in JavaScript, using the Meteor full stack framework.
Dockerfile is a text document that contains all the information/commands that what we need to configure any application in the respective container.
The Registry is an online storage for container images and lets you distribute Container images.
We can use any of following Container Registry for storing.
Kubectl is command line tool to manage Kubernetes cluster remotely and you can also configure in your machine follow this link.
Notes - If you are using an official image of Rocket Chat and MongoDB then you can skip Step 1, 2, 3, 4, 5, 6 and move forward to Storage Volume (Step 7).
Steps for Deploying Rocket Chat on Kubernetes
Step 1 - Create a Rocket Chat Container Custom Image
Create a file name “Dockerfile” for Rockets Chat Container Image.
$ touch Dockerfile
Now Add the Following content to the dockerfile of Rocket Chat application
FROM node: 4 - slim
MAINTAINER Don
COPY bundle / /app/
RUN cd / app / programs / server\ && npm install
ENV PORT = 3000\
ROOT_URL = http: //localhost:3000
 EXPOSE 3000
CMD["node", "/app/main.js"]
This Rocket Chat Application is based on NodeJS so we need to use NodeJS docker image from docker hub as a base image for Rocket Chat application.
After then we put our custom code of the Rocket Chat application to docker container and install all the required dependencies of rocket chat application to docker container.
Step 2 - Build Rocket Chat Docker Custom Image
$ docker build -t rocketchat:v1.0
Step 3 - Create a MongoDB Container Custom Image
Create a file name “Dockerfile” for MongoDB Container Image in new Folder named MongoDB.
$ mkdir mongodb && cd mongodb
$ touch Dockerfile
Now Add the Following content to the dockerfile of Mongo -
FROM ubuntu
MAINTAINER Don
RUN apt - key adv--keyserver hkp: //keyserver.ubuntu.com:80 --recv 7F0CEB10 && \
 echo "deb http://repo.mongodb.org/apt/ubuntu   trusty/mongodb-org/3.0 multiverse" | tee / etc / apt / sources.list.d / mongodb - org - 3.0.list && \
 apt - get update && \
 apt - get install - y mongodb - org
VOLUME["/data/db"]
WORKDIR / data
EXPOSE 27017
CMD["mongod"]
This MongoDB image has a base image of Ubuntu but we can also use official docker image of MongoDB. We have created this dockerfile for MongoDB Version 3.0 for some compatibility reasons with Rocket Chat Application.
Next, we mount Volume “/data/db” for persistent storage of container.
Next, we expose 27017 port for incoming requests to MongoDB server. Then, we start MongoDB server in dforeground mode so that we can see logs in “stdout” of container.
Step 4 - Building a MongoDB Docker Custom Image
$ docker build -t mongo:v3.0
Step 5 - Adding Container Registry to Docker Daemon
If you are using docker registry other than docker hub to store images then you need to add that container registry to your local docker daemon and kubernetes Docker Nodes also.
There are so many ways to add container registry to docker daemon as per different operating systems.
So i will explain one of them which i'm using daily basis.
$ docker version
Client:
 Version: 17.03 .1 - ce
API version: 1.27
Go version: go1 .7 .5
Git commit: c6d412e
Built: Mon Mar 27 17: 14: 09 2017
OS / Arch: linux / amd64(Ubuntu 16.04)
Now we need to Create a “daemon.json” in below mentioned location
$ sudo nano /etc/docker/daemon.json
And add the following content to it.
{
"insecure-registries": ["<name of your private registry>"]
}
Now Run the following commands to reload systemctl and restart docker daemon.
$ sudo systemctl daemon-reload
$ sudo service docker restart
To verify that your container registry is added to local docker daemon, use the below mentioned steps.
$ docker info
In output of above you get your container registry like this
Insecure Registries:
<your container registry name>
127.0.0.0/8
Step 6 - Pushing Custom PostgreSQL Container Image to Container Registry
Let's start to uploading our custom images to container registry like
-
Private Docker Hub
-
AWS ECR
-
Docker Store
-
Google Container Registry
If you have authentication enabled on container registry then you need to login first then we can upload or download images from container registry.
To Login follow below mentioned command
$ docker login <name of your container registry>
Username : xxxx
Password: xxxxx
For AWS ECR you will get registry url, username and password from respective cloud provider when you launch container registry on cloud.
Here is shell script that will add your aws credentials for Amazon ECR.
#!/bin/bash

pip install--upgrade--user awscli

mkdir - p~/.aws && chmod 755 ~/.aws

cat << EOF > ~/.aws/credentials [
 default
]
aws_access_key_id = XXXXXX
aws_secret_access_key = XXXXXX
EOF

cat << EOF > ~/.aws/config [
 default
]
output = json
region = XXXXX
EOF

chmod 600~/.aws/credentials

ecr - login = $(aws ecr get - login--region XXXXX)
$ecr - login
Now we need to tag rocketchat images and push them to any of the above mentioned container registry.
To Tag images
$ docker tag rocketchat:v1.0 <name of your registry>/rocketchat:v1.0
$ docker tag mongo:v3.0 <name of your registry>/mongo:v3.0
To Push Images
$ docker push <name of your registry>/rocketchat:v1.0
$ docker push <name of your registry>/mongo:v3.0
Similarly we can push images to any of above mentioned container registry like aws ecr , google container registry or azure container registry etc.
Step 7 - Create a Storage Volume (Using GlusterFS)
Using below mentioned command we create a volume in GlusterFS cluster for MongoDB. As we are using glusterfs as persistent volume to mongodb container so we need to create volume in GlusterFS. We need to add the IP Address or DNS instead of node1 and node2 as you specified in your installation of glusterfs.
$ gluster volume create apt - cacher replica 2 transport tcp k8 - master: /mnt/brick
1 / mongodb - disk k8 - 1: /mnt/brick
1 / mongodb - disk
$ gluster volume start mongodb - disk
$ gluster volume info mongodb - disk
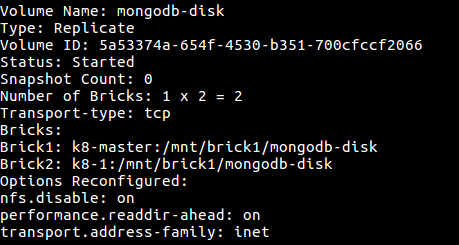
Figure - Information of Gluster Volume
Step 8 - Deploy MongoDB on Kubernetes
Deploying MongoDB Single Node on Kubernetes have following prerequisites -
-
Docker Image: We have created a Docker Image for MongoDB in Step 4 and pushed to docker hub or private docker registry.
-
Persistent Shared Storage Volume: We have created a Persistent Shared Storage Volume of glusterfs in Step 6
-
Deployment & Service Files: Next, we will create Deployment & Service Files for Kubernetes.
let`s create a Deployment file name “mongodb.deployment.yml” for MongoDB.
$ touch mongodb.deployment.yml
Now Add the Following content to the deployment file of MongoDB -
apiVersion: extensions / v1beta1
kind: Deployment
metadata:
 name: mongodb3
namespace: production
spec:
 replicas: 1
template:
 metadata:
 labels:
 k8s - app: mongodb3
spec:
 containers:
 -name: mongodb3
image: dr.xenonstack.com: 5050 / mongo: v3 .0
imagePullPolicy: "IfNotPresent"
ports:
 -containerPort: 27017
volumeMounts:
 -mountPath: /data/db
name: mongodisk1
volumes:
 -name: mongodisk1
glusterfs:
 endpoints: glusterfs - cluster
path: mongodb - disk
readOnly: false
In deployment file contains information about namespace , replicas set , docker image name , port number and persistent volumes we are going to use in kubernetes.
We also need to create a service file named “mongodb.service.yml” for MongoDB.
$ touch mongodb.service.yml
Now Add the Following content to the service file of MongoDB -
apiVersion: v1
kind: Service
Metadata:
 labels:
 k8s - app: mongodb3
name: mongodb3
namespace: production
spec:
 type: NodePort
Ports:
 -port: 27017
selector:
 k8s - app: mongodb3
In service file contains information about namespace , type of port and external ip if want to assign any public ip to container in kubernetes.
Now we Just need to launch MongoDB as a Standalone instance in Kubernetes Cluster using Kubectl.
$ kubectl create -f mongodb.deployment.yml
$ kubectl create -f mongodb.service.yml
Now we check MongoDB deployment and service either using kubernetes dashboard or kubectl command line.
Using Dashboard of Kubernetes
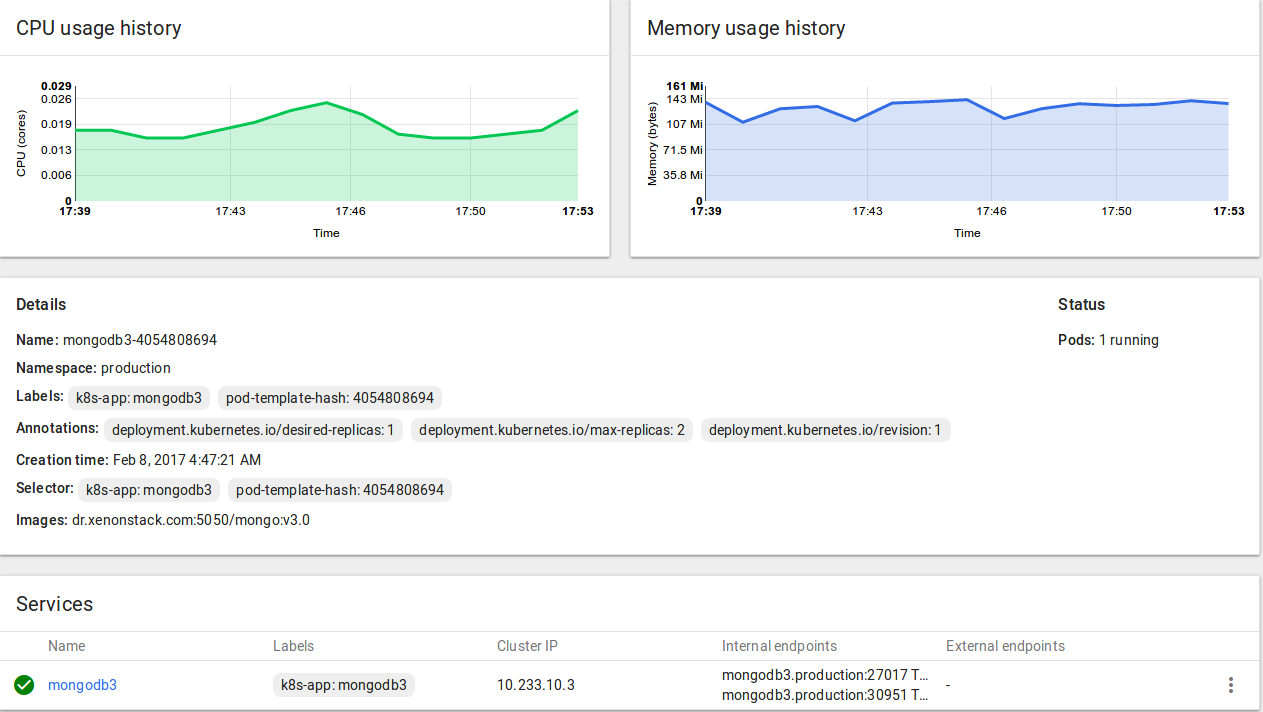
Figure - Kubernetes Dashboard for MongoDB
Using Kubectl (CommandLine)
$ kubectl get po --namespace=testing | grep mongodb3
$ kubectl get svc --namespace=testing | grep mongodb3
Step 9 - Deploy Rocket Chat on Kubernetes
Deploying Rocket Chat on Kubernetes have following prerequisites -
-
Docker Image: We have created a Docker Image for Rocket chat in Step 2.
-
Deployment & Service Files: In the below mentioned steps, we will create Deployment & Service Files.
As we are using MongoDB for storing files of Rocket Chat so we don`t need to mount any volume to Rocket Chat container.
Now let’s create a Deployment file name “rocketchat.deployment.yml” for Rocket Chat.
$ touch rocketchat.deployment.yml
Now Add the Following content to the deployment file of Rocket Chat -
apiVersion: extensions / v1beta1
kind: Deployment
metadata:
 name: rocketchat
namespace: production
spec:
 replicas: 1
template:
 metadata:
 labels:
 k8s - app: rocketchat
spec:
 containers:
 -name: rocketchat
image: dr.xenonstack.com: 5050 / rocketchat: v1 .0
imagePullPolicy: "IfNotPresent"
ports:
 -containerPort: 3000
env:
 -name: MONGO_URL
value: "mongodb://mongodb3:27017/rocketchat"
In deployment file contains information about namespace, replicas set, docker image name, port number and persistent volumes we are going to use in Kubernetes.
We also need to create a Service file name “rocketchat.service.yml” for Rocket Chat.
$ touch rocketchat.service.yml
Now Add the Following content to the service file of Rocketchat :-
apiVersion: v1
kind: Service
metadata:
 labels:
 k8s - app: rocketchat
name: rocketchat
namespace: production
spec:
 type: NodePort
ports:
 -port: 3000
selector:
 k8s - app: rocketchat
In service file contains information about namespace, type of port and external ip if want to assign any public ip to container in Kubernetes.
Now we Just need to launch Rocketchat as instance in Kubernetes Cluster using Kubectl.
$ kubectl create -f rocketchat.deployment.yml
$ kubectl create -f rocketchat.service.yml
Now we check MongoDB deployment and service either using Kubernetes dashboard or kubectl command line.
Using Dashboard of kubernetes
Figure - Kubernetes Dashboard for rocketchat
Using Kubectl (CommandLine)
$ kubectl get po --namespace=testing | grep rocketchat
$ kubectl get svc --namespace=testing | grep rocketchat
Now you have successfully deployed Rocket Chat on Kubernetes with MongoDB.
Step 10 - Test MongoDB Database
Use the below-mentioned command to connect MongoDB database
$ mongo --host <cluster ip> --port 27017
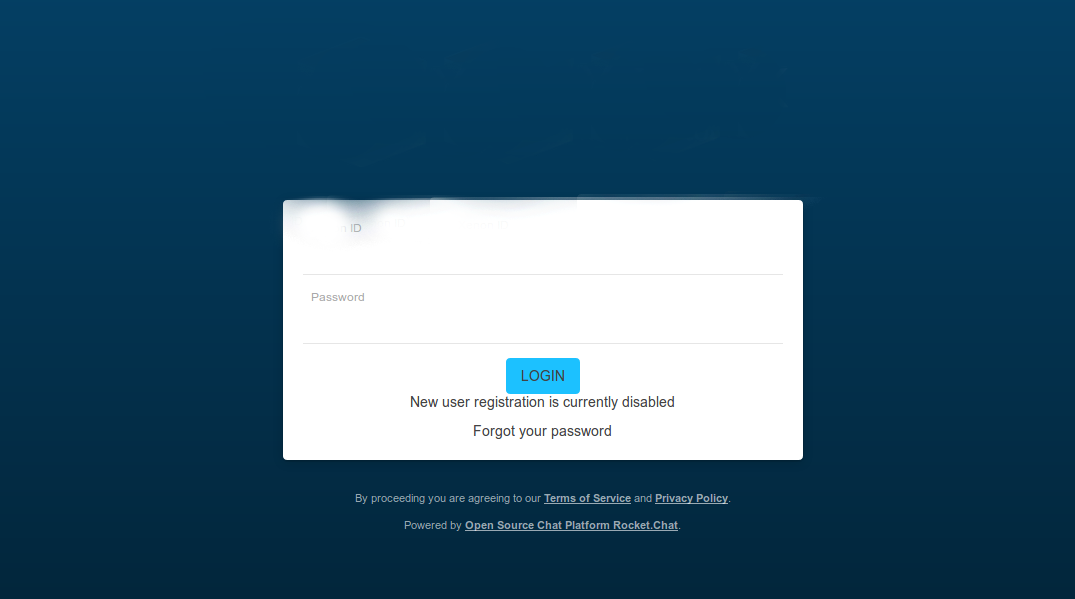
Step 11 - Test Rocket Chat Application
Open Cluster-IP with 3000 port in your browser to check Rocket Chat is running or not.
Step 12 - Troubleshooting of Rocket Chat Application Container
-
Check Logs of Rocket Chat Application and MongoDB Pods.
-
Check the NameSpace of both Containers/Pods/Service of MongoDB and RocketChat is in same.
-
Try to Connect MongoDB from local Mongo Client using Cluster IP Address.
-
Check Network Connectivity from Rocketchat to MongoDB Pods.
Notes - I haven't tested Rocketchat application with MongoDB authentication enabled.
Summarizing Rocket Chat Deployment on Kubernetes
With Container Architecture, Midsize and Small Enterprises Build their own On-Premises Cloud Infrastructure using Docker and Kubernetes for Continuous Integration and Delivery pipeline for Application Development environments with Different Programming languages like Java, .NET, Python, Node.js and also Build Testing Environment for Microservices.
At Don, We help Enterprises to Plan, Build, Monitor and Manage Continuous Delivery Pipeline using Docker and Kubernetes Solution.Reach Us for Deployment and Consulting on DevOps, Kubernetes and Docker Cloud Solutions. We Provide Consulting and Deployment for DevOps for Big Data and Data Science.
Don Offerings
Don is a leading Software Company in Product Development and Solution Provider for DevOps, Big Data Integration, Real Time Analytics & Data Science.