
BlockChain App Deployment with Microservices on Kubernetes
Reading Time: 5 Minutes
by | December 27, 2017

What is a BlockChain?
The BlockChain is a distributed database that maintains a continuously-growing list of ordered records called blocks. This technology underlying Bitcoin and other cryptocurrencies. It is a public ledger of all Bitcoin transaction. These blocks are added in a chronological order. In order to deploy a blockchain application, you need a distributed Hyperledger blockchain on your choice of infrastructure (on-premise or cloud).
In this article, we will deploy a Hyperledger Fabric cluster using Kubernetes.
Prerequisites
To follow this guide you need a system with working kubernetes cluster on it. We will use Fabric which is an implementation of blockchain technology written in Golang so go version go1.6.2 or above is required.
Before proceeding further let’s have a look on Hyperledger Fabric.
The Hyperledger Project
Hyperledger is an open source project with collaborative effort created to advance blockchain technology. It helps in cross-industry distributed ledgers which support transaction system, property transaction, and other services.
Hyperledger Fabric
The Fabric is an implementation of blockchain technology. It provides a modular architecture allowing pluggable implementations of the various function.
Hyperledger Kubernetes Replication Controller
We will launch hyperledger on kubernetes as a Replication Controller it will ensure us the high - availability of hyperledger pods.
Create a file named membersrvc-rc.yml.
apiVersion: v1
kind: ReplicationController
metadata:
 creationTimestamp: null
labels:
 service: membersrvc
name: membersrvc
namespace: default
spec:
 replicas: 1
selector:
 service: membersrvc
template:
 metadata:
 creationTimestamp: null
labels:
 service: membersrvc
spec:
 containers:
 -command:
 -membersrvc
image: hyperledger / fabric - membersrvc
imagePullPolicy: ""
name: membersrvc
ports:
 -containerPort: 7054
resources: {}
restartPolicy: Always
serviceAccountName: ""
volumes: null
status:
 replicas: 0
In the same way, create another file vp0-rc.yml
apiVersion: v1
kind: ReplicationController
metadata:
 creationTimestamp: null
labels:
 service: vp0
name: vp0
namespace: $ {
 NAMESPACE
}
spec:
 replicas: 1
selector:
 service: vp0
template:
 metadata:
 creationTimestamp: null
labels:
 service: vp0
spec:
 containers:
 -command:
 -sh - -c - sleep 5;
peer node start--peer - chaincodedev
env:
 -name: CORE_PEER_ADDRESSAUTODETECT
value: "true" - name: CORE_VM_ENDPOINT
value: unix: ///var/run/docker.sock
 -name: CORE_LOGGING_LEVEL
value: DEBUG - name: CORE_PEER_ID
value: vp0 - name: CORE_PEER_PKI_ECA_PADDR
value: membersrvc: 7054 - name: CORE_PEER_PKI_TCA_PADDR
value: membersrvc: 7054 - name: CORE_PEER_PKI_TLSCA_PADDR
value: membersrvc: 7054 - name: CORE_SECURITY_ENABLED
value: "false" - name: CORE_SECURITY_ENROLLID
value: test_vp0 - name: CORE_SECURITY_ENROLLSECRET
value: MwYpmSRjupbT
image: hyperledger / fabric - peer
imagePullPolicy: ""
name: vp0
ports:
 -containerPort: 7050 - containerPort: 7051 - containerPort: 7053
resources: {}
restartPolicy: Always
serviceAccountName: ""
volumes: null
status:
 replicas: 0
That’s enough with replication controller. Now our next target is to deploy services for the Replication Controller.
Create a file called membersrvc-srv.yml
apiVersion: v1
kind: Service
metadata:
 creationTimestamp: null
name: membersrvc
namespace: default
spec:
 ports:
 -name: ""
nodePort: 0
port: 7054
protocol: ""
targetPort: 0
selector:
 service: membersrvc
status:
 loadBalancer: {}
Create another file vp0-srv.yml
apiVersion: v1
kind: Service
metadata:
 creationTimestamp: null
name: vp0
namespace: default
spec:
 type: NodePort
ports:
 -name: "port1"
port: 7050
protocol: ""
targetPort: 0 - name: "port2"
nodePort: 0
port: 7051
protocol: ""
targetPort: 0 - name: "port3"
nodePort: 0
port: 7053
protocol: ""
targetPort: 0
selector:
 service: vp0
status:
 loadBalancer: {}
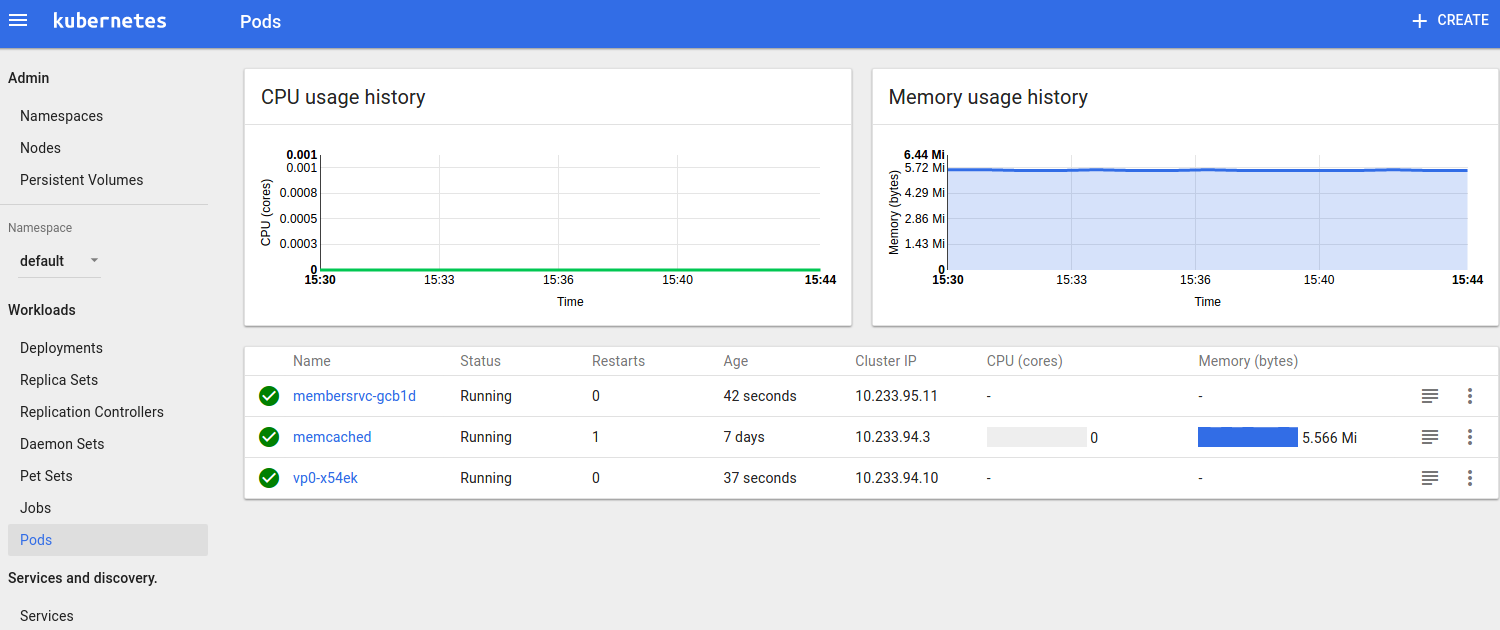
Running Hyperledger Pods
After creating all the necessary file, next step is to start these rc pods
$ kubectl create -f membersrvc-rc.yml
$ kubectl create -f vp0-rc.yml
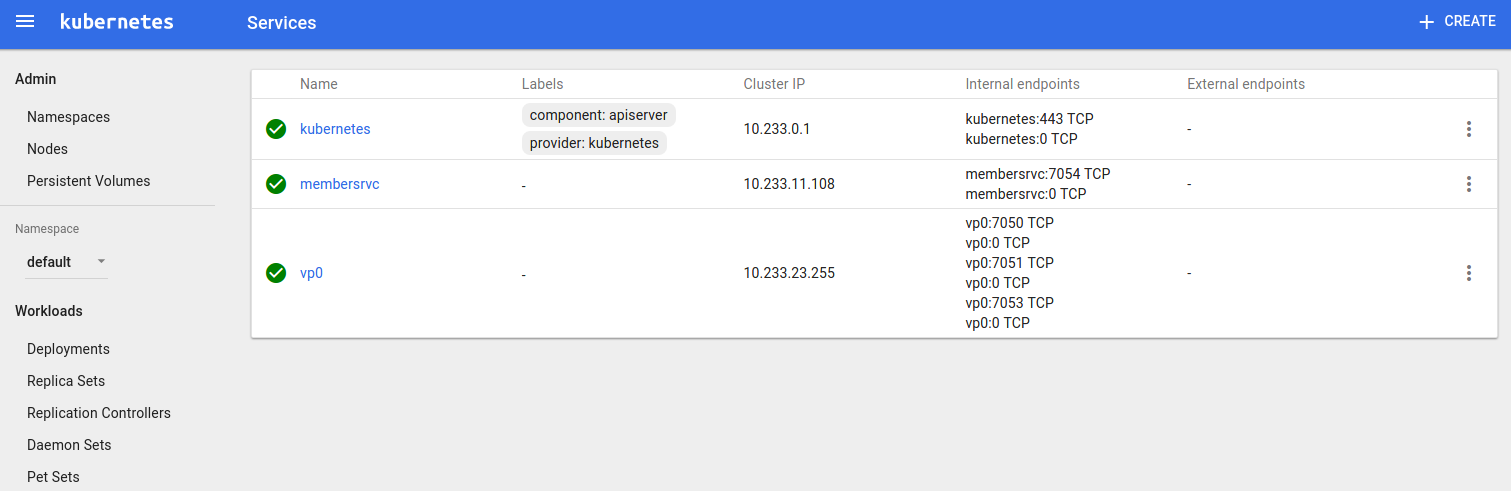
Running Hyperledger Services
Now start the service for hyperledger
$ kubectl create -f membersrvc-srv.yml
$ kubectl create -f vp0-srv.yml
Running the ChainCode
Before running ChainCode you need to set your $GOPATH and then make a directory to download the sample ChainCode in the src directory.
mkdir - p $GOPATH / src / github.com / chaincode_example02 /
 cd $GOPATH / src / github.com / chaincode_example02
Curl--request GET https: //raw.githubusercontent.com/hyperledger/fabric/master/examples/chaincode/go/chaincode_example02/chaincode_example02.go > chaincode_example02.go
Next, you’ll need to download the Hyperledger fabric to your local $GOPATH, after that you have to build the ChainCode.
mkdir - p $GOPATH / src / github.com / hyperledger
cd $GOPATH / src / github.com / hyperledger
git clone http: //gerrit.hyperledger.org/r/fabric
Go to chaincode_example02 directory and build the code
cd $GOPATH / src / github.com / chaincode_example02
go build
Starting and registering the ChainCode
Run the following command to start the ChainCode.
CORE_CHAINCODE_ID_NAME = mycc CORE_PEER_ADDRESS = 0.0 .0 .0: 7051. / chaincode_example02
After that ChainCode console will display the message “Received REGISTERED, ready for invocations” which shows that ChainCode is ready for use.

Running Rest API
To log in with the help of REST API, send a POST request to the /registrar endpoint, with the enrollmentID and enrollmentPW. These parameters are listed in the eca.users section of the membersrvc.yaml file.
REST Request:
POST localhost: 7050 / registrar {
 "enrollId": "jim",
 "enrollSecret": "6avZQLwcUe9b"
}
REST Response:
200 OK {
 "OK": "Login successful for user 'jim'."
}
If try to log in again it should say user already logged in.

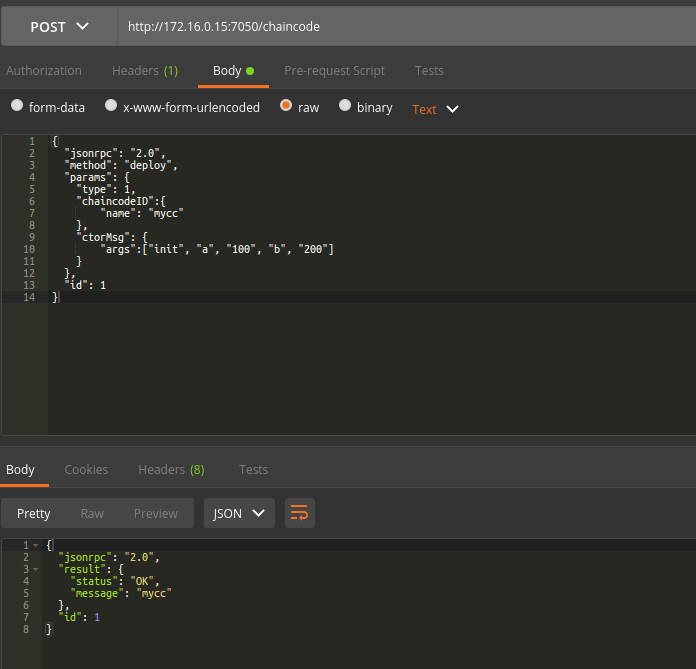
REST Request:
POST / chaincode

{
 "jsonrpc": "2.0",
 "method": "deploy",
 "params": {
  "type": 1,
  "chaincodeID": {
   "name": "mycc"
  },
  "ctorMsg": {
   "args": ["init", "a", "100", "b", "200"]
  }
 },
 "id": 1
}
REST Response:
{
 "jsonrpc": "2.0",
 "result": {
  "status": "OK",
  "message": "mycc"
 },
 "id": 1
}
You can also track the events on the console also.
![]()
Summary
BlockChains can support the creation of new, more efficient business processes. Now as you understand the basic fundamentals of BlockChain Technology, you need to decide whether BlockChain fits your needs or not. There will be a rush to develop new decentralized apps so as to enable the decentralized world that we are moving towards. Considering this fact, Business Leaders need to learn a new vocabulary around crypto-related frameworks. Developers need to learn how to write decentralized apps that are enabled by BlockChain Technology. And End Users need to learn how to create or use smart contracts, e.g. as depicted via the Mist browser vision (Ethereum), which is a mix of marketplace discovery, management dashboard, and creation platform, all-in-one.
Decentralized Apps will come in different sizes, flavors and complexity levels. At Don we are prepared for that and have specialized professionals to develop the solutions. Reach Us for Deployment and Consulting on BlockChain Technology Solutions.
Don Offerings
Don is a leading Software Company in Product Development and Solution Provider for DevOps, Big Data Integration, Real Time Analytics & Data Science.
Product NexaStack - Unified DevOps Platform Provides monitoring of Kubernetes, Docker, OpenStack infrastructure, Big Data Infrastructure and uses advanced machine learning techniques for Log Mining and Log Analytics.
Product ElixirData - Modern Data Integration Platform Enables enterprises and Different agencies for Log Analytics and Log Mining.
Product Akira.AI is an Automated & Knowledge Drive Artificial Intelligence Platform that enables you to automate the Infrastructure to train and deploy Deep Learning Models on Public Cloud as well as On-Premises.